FREE PATTERN: Shell-Edged Granny Square Headband
Hey hey!
So the verdict is in...granny squares are definitely not just for grannies. If you ask me, they're making a comeback. So let's all be on the cusp of that comeback, mmkay?
Sounds good.

Materials
25-50 yards each of Color A (pink), Color B (off-white), and Color C (Blue)
H (5.00mm) crochet hook
Tapestry needle
Scissors
Notes
1. To make a smaller headband for a baby or child, you could just decrease the number of granny squares you use, and maybe use a G (4mm) crochet hook for a smaller square.
Instructions
1. With Color A, ch 4, join with sl st to form a ring. Ch 4, (3dc into ring, ch 2) 3 times, 2dc into ring, sl st to 2nd ch of starting ch4.

2. With Color B, ch 3, 2dc, ch 2, 3dc into space, (ch 1, 3dc, ch 2, 3 dc into space) 3 times, sl st to 3rd ch of beginning ch 1
Fasten off, weave in ends.

Repeat steps 1-2 six more times (for teen/woman size, less for smaller sizes), so that you have 7 identical squares.
With Color C, insert your hook into the first chain of a ch-2 space (it doesn't matter which corner you do it on). Now without removing your hook, do the same on another granny square, like so.

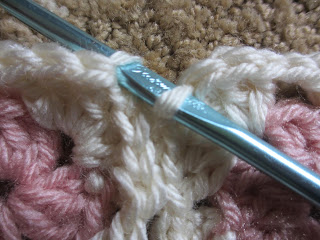
Now work a slip stitch into the 2 inside loops (the back loop of one, the front loop of the other) of the next stitch, like so. You will be pushing the outer loops to the outside.
 Repeat this across, so that the 2 squares are attached.
 Then repeat until you have all the squares sewn together, like so.
 Now take the first and last square on the ends and slip stitch them together in the same way until you have one continuous loop. You can choose to stop here and have a simple granny square headband, or continue on and add the shell edging :)

For the shell edging, insert hook (still using Color C) in the top corner of one of the squares (it doesn't matter which square you start on) and sc in each stitch around. Sl st to first sc.

 Ch 2, 4dc in same, skip 1, sc, skip 1. {5dc, skip 1, sc, skip 1} around, join with sl st. Fasten off, weave in ends.
 Now turn headband over and repeat the last 2 rows on that side.
And now you're done! Wasn't that easy? Now let's rock these headbands and usher in a new era of granny square glory.

So the verdict is in...granny squares are definitely not just for grannies. If you ask me, they're making a comeback. So let's all be on the cusp of that comeback, mmkay?
Sounds good.

Here's a granny square headband to kick start this comeback!
Materials
25-50 yards each of Color A (pink), Color B (off-white), and Color C (Blue)
H (5.00mm) crochet hook
Tapestry needle
Scissors
Notes
1. To make a smaller headband for a baby or child, you could just decrease the number of granny squares you use, and maybe use a G (4mm) crochet hook for a smaller square.
Instructions
1. With Color A, ch 4, join with sl st to form a ring. Ch 4, (3dc into ring, ch 2) 3 times, 2dc into ring, sl st to 2nd ch of starting ch4.

2. With Color B, ch 3, 2dc, ch 2, 3dc into space, (ch 1, 3dc, ch 2, 3 dc into space) 3 times, sl st to 3rd ch of beginning ch 1
Fasten off, weave in ends.

Repeat steps 1-2 six more times (for teen/woman size, less for smaller sizes), so that you have 7 identical squares.
With Color C, insert your hook into the first chain of a ch-2 space (it doesn't matter which corner you do it on). Now without removing your hook, do the same on another granny square, like so.


Now work a slip stitch into the 2 inside loops (the back loop of one, the front loop of the other) of the next stitch, like so. You will be pushing the outer loops to the outside.


For the shell edging, insert hook (still using Color C) in the top corner of one of the squares (it doesn't matter which square you start on) and sc in each stitch around. Sl st to first sc.


And now you're done! Wasn't that easy? Now let's rock these headbands and usher in a new era of granny square glory.


This is very sweet, I made one square in 8ply measures 5 cm, and another in fine crochet cotton measures 2cm. Cute.
ReplyDeleteRE: the granny square headband. I made this but had problems. How do you go from pink to white-connecting? How do you finish off when you attach each square? I had big problems with the attached stitching-didn't look like yours at all. What am I doing wrong. I love the headband itself.
ReplyDeleteThis was aa lovely blog post
ReplyDelete